submitted by Laura Nealon
This is a great event for older girls to run. The older girls in our Service Unit run so many events that we made a decision to let them just be participants. We had 5 adult volunteers at the event but could have used more.
We charged $5 per girl. This allowed us to purchase 7 swaps, supplies to make each girl a swap holder, ice cream with chocolate syrup, sprinkles and whipped cream and a patch. Event was 2 hours. The amount of time was appropriate. Everyone had plenty of time to finish, eat and mingle and swap.
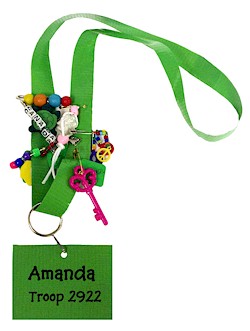
Swap holder
For 140 we used 7 rolls of solid color duct tape, 1 roll of decorative print duct tape (used about ½ of decorative roll), 4 packs of 1 ¼ inch key ring, 3 fifty packs of medium swap tags and two bags of peel and stick gems. Total cost (not including shipping because the makingfriends shop is local) $71.83. It took about 6 hours of at least two people working together to complete all of them. These were done by the adults and a few girls from older troops in advance of event.
 We revised the directions found on makingfriends
We used about 34 inches of the first color (went with a pink, we felt solid background would work better as a backdrop for the swaps) for each holder. (20 yards of duct tape is not quite 20 yards of useable duct tape). We felt the 30 inches used in directions was little short but 36 inches meant less than 20 holders per roll of duct tape. Once you do the first roll, you’ll be able to add or subtract inches per piece as needed. We used a coordinating patterned duct tape for the second piece. It was more expensive but to make 140 holders, we used less than ½ of a roll so it worked out fine.
Instead of folding the long strip in half as suggested, we folded it in thirds. It requires two people providing tension at each end and folding from the center out but we felt this was more forgiving when it came to wrinkles and there was no worry of folding it exactly in half so sticky side wasn’t showing. One of the ladies had great success picking up the piece after it was folded and running fingers over it from end to end getting even more wrinkles out.
The patterned duct tape was cut into 1 ½ to 1 ¾ inch lengths and then split up the middle. It’s easier with two people but can be done by one. We took the two ends of the long piece and placed them on top of each other with both sides having the seam side up. Slide the top one up a little. We used 1 ¼ inch key ring and we slid it onto the bottom piece (if one end came out worse than the other, it can be hidden here). Then fold the bottom piece over the top piece with the ring at the fold. The second person has the small patterned duct tape upside down on the table. The first person places the tape with the ring over the upside down duct tape at the point that the two ends intersect. The second person folds the small piece of duct tape over and secures well.
We skipped the lanyard hook in the making friends version. We used tags we found there with holes already punched at a reasonable price and slid those onto the key ring.
The girls wrote their names on them and were even given a self stick gem to decorate.
SWAPS

Get some great SWAP ideas on Makingfriends
Setting up the groups and sign in
We took the number of scouts and divided by the number of swaps. In our case it worked out to exactly 19 in each group. Our plan if it wasn’t to make the groups as even as possible and the groups that had one less person would work together to make the extra swaps that would be needed. Our total was 133 scouts so each group made 133 swaps which averaged out to 7 each. The groups that had scouts that did not show up prepared the swap holder for the missing scouts and made their portion of the swaps. Larger troops were split approximately in ½ to ensure that we didn’t have a troop of 18 at one table with only 1 troop member from another troop with them. I used a spread sheet to figure it out.
I used a color code to help ensure that the age of the girls in each group were kind of close together. You may prefer to mix it more but since our Cadette/Senior/Ambassador troops (all indicated as Cadette above) usually run events, we wanted them to have opportunity to enjoy a little time together having fun.
THE SWAP
The girls then went around swapping and meeting new scouts. They really enjoyed this. Apparently a few girls didn’t understand that they were supposed to exchange and not just take from other scouts so some did leave with less than 7 swaps. This needs to be explained better for scouts that have never done this before. Of course we are using the extra swaps to replace whatever any of the girls were missing (at the next leader meeting) so in the end everyone has at least 7.
We explained how swaps usually work, making them as a troop and trading with other scouts at events like camping, council events and more.
The girls had a great time and during the event said they can’t wait to swap at future events. SWAPS are going to be welcome at any event as long as it doesn’t take over the event and will mostly be done around check in time which will actually keep the girls busy until the event starts.
The Ice Cream and Closing
We ended the event with Ice Cream social and singing Make New Friends.


Leave a Reply