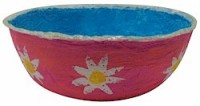
Plaster Daisy Bowl
 Working on your Daisy Garden Journey? Senior Room Makeover? Rigid Wrap is a much better choice than paper mache. It dries quick so you won’t be taking home a soggy paper mache project. The finished project will be rock hard and sturdy enough to last through your entire journey.
You need:
- Activa Rigid Wrap
- Acrylic Paint
- Foam Brush
- Large Mixing Bowl
- Disposable Plastic Plate
- Dishwashing Soap
- Scissors
- Bowl of Water
- Sponge (optional)
Instructions:
Lightly cover the outside of a bowl with dishwashing soap. This will keep the plaster from sticking to the mold. Turn bowl upside down on a disposable plastic plate. Cut Rigid Wrap into appropriate sizes according to the size bowl you are using. Dip a strip in the bowl of water and apply to your upside mold bowl. Continue dipping and applying strips, smoothing the plaster strips with wet fingers. Cover the bowl completely with at least two layers. The more layers, the stronger your project will be. Let dry, easing the bowl mold out after about 10-15 minutes of drying time. Trim edge with scissors. Let dry completely, microwaving if necessary.
Finish by painting, to get the white daisys as shown above first paint the entire bowl. Then cut a sponge into the shape of a daisy, dip into white paint and apply. Paint the center yellow to finish the daisy.